Friday, March 30, 2012

Automatically M-file Generator (GUI MATLAB)

วันนี้ผมจะนำเสนอ GUI สำหรับสร้าง m-file โดยอัตโนมัติ เพื่อประโยชน์สำหรับติดต่อกับผู้ใช้ โดยที่ผู้ใช้ต้องใส่พารามิเตอร์ต่างๆ ตัวอย่างนี้เป็นการสร้างฟังก์ชันไฟล์ หรือจะเรียกว่า library file เพื่อเรียกมาใช้ในครั้งต่อไปสำหรับโปรแกรมหนึ่งๆ ที่จำเป็นต้องใช้ ข้อมูล สมการ เดิมๆ บ่อยๆ
%------------------------------------------------------------------------
ยกตัวอย่าง function ใน MATLAB อธิบายสั้นๆ ดังนี้
function [ a , b ] = plus( x , y )

a=y+x-1;
b=y+x+1;

เมื่อต้องการบันทึกไฟล์นี้ MATLAB จะบังคับให้บันทึกเป็นชื่อ plus ครับ
การทำงานของไฟล์นี้ ผู้ใช้ต้องมีค่า x และ y ให้ฟังก์ชันนี้ เมื่อทำงานเสร็จ จะส่งค่า a และ b ออกมา
%------------------------------------------------------------------------

ผมขอยกตัวอย่างโปรแกรมขึ้นมาแสดงก่อนนะครับ รูปด้านล่างเป็นหน้าตา layout และโปรแกรมที่พร้อมทำงานครับ ไฟล์ที่สร้างขึ้นมีชื่อว่า LibraryGen.m และ LibraryGen.fig
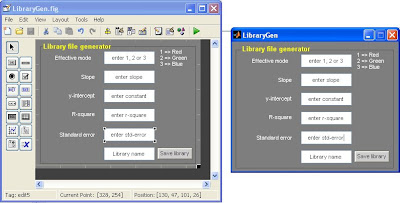

และรูปด้านล่างเป็นหน้าต่างโปรแกรมที่ทำงานแล้วครับ
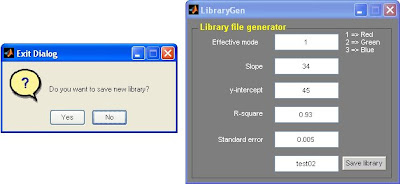

ผมขอรวบรัดนิดนึงครับ สำหรับงานนี้ ส่วนหลักๆที่เราต้องเพิ่มเติม source code มีดังนี้ครับ
- การรับค่าจาก edit text ใช้ get(handles. tag ของ edittext ที่เราตั้ง, 'string')
แล้วเก็บเป็น handles.ตัวแปรที่ใช้เก็บค่า สังเกตจากตัวอย่างด้านล่างครับ (บรรทัดสีแดง)
- การเขียนไฟล์ไปบน editor พร้อมบันทึกค่า ในที่นี้เป็น function file ครับ
คำสั่งที่ต้องใช้ครับ fopen and fprintf

function edit1_Callback(hObject, eventdata, handles)
% hObject handle to edit1 (see GCBO)
% eventdata reserved - to be defined in a future version of MATLAB
% handles structure with handles and user data (see GUIDATA)
effectiveSignal=get(handles.edit1,'string');
handles.EffectiveSignal=effectiveSignal;
% Hints: get(hObject,'String') returns contents of edit1 as text
% str2double(get(hObject,'String')) returns contents of edit1 as a double
guidata(gcbo,handles);

% --- Executes during object creation, after setting all properties.
function edit1_CreateFcn(hObject, eventdata, handles)
% hObject handle to edit1 (see GCBO)
% eventdata reserved - to be defined in a future version of MATLAB
% handles empty - handles not created until after all CreateFcns called

% Hint: edit controls usually have a white background on Windows.
% See ISPC and COMPUTER.
if ispc && isequal(get(hObject,'BackgroundColor'), get(0,'defaultUicontrolBackgroundColor'))
set(hObject,'BackgroundColor','white');
end

function edit2_Callback(hObject, eventdata, handles)
% hObject handle to edit2 (see GCBO)
% eventdata reserved - to be defined in a future version of MATLAB
% handles structure with handles and user data (see GUIDATA)
slope=get(handles.edit2,'string');
handles.Slope=slope;
% Hints: get(hObject,'String') returns contents of edit2 as text
% str2double(get(hObject,'String')) returns contents of edit2 as a double
guidata(gcbo,handles);

% --- Executes during object creation, after setting all properties.
function edit2_CreateFcn(hObject, eventdata, handles)
% hObject handle to edit2 (see GCBO)
% eventdata reserved - to be defined in a future version of MATLAB
% handles empty - handles not created until after all CreateFcns called

% Hint: edit controls usually have a white background on Windows.
% See ISPC and COMPUTER.
if ispc && isequal(get(hObject,'BackgroundColor'), get(0,'defaultUicontrolBackgroundColor'))
set(hObject,'BackgroundColor','white');
end

function edit3_Callback(hObject, eventdata, handles)
% hObject handle to edit3 (see GCBO)
% eventdata reserved - to be defined in a future version of MATLAB
% handles structure with handles and user data (see GUIDATA)
yintercept=get(handles.edit3, 'string');
handles.Yintercept=yintercept;
% Hints: get(hObject,'String') returns contents of edit3 as text
% str2double(get(hObject,'String')) returns contents of edit3 as a double
guidata(gcbo,handles);

% --- Executes during object creation, after setting all properties.
function edit3_CreateFcn(hObject, eventdata, handles)
% hObject handle to edit3 (see GCBO)
% eventdata reserved - to be defined in a future version of MATLAB
% handles empty - handles not created until after all CreateFcns called

% Hint: edit controls usually have a white background on Windows.
% See ISPC and COMPUTER.
if ispc && isequal(get(hObject,'BackgroundColor'), get(0,'defaultUicontrolBackgroundColor'))
set(hObject,'BackgroundColor','white');
end

function edit4_Callback(hObject, eventdata, handles)
% hObject handle to edit4 (see GCBO)
% eventdata reserved - to be defined in a future version of MATLAB
% handles structure with handles and user data (see GUIDATA)
rsquare=get(handles.edit4, 'string');
handles.Rsquare=rsquare;
% Hints: get(hObject,'String') returns contents of edit4 as text
% str2double(get(hObject,'String')) returns contents of edit4 as a double
guidata(gcbo,handles);

% --- Executes during object creation, after setting all properties.
function edit4_CreateFcn(hObject, eventdata, handles)
% hObject handle to edit4 (see GCBO)
% eventdata reserved - to be defined in a future version of MATLAB
% handles empty - handles not created until after all CreateFcns called

% Hint: edit controls usually have a white background on Windows.
% See ISPC and COMPUTER.
if ispc && isequal(get(hObject,'BackgroundColor'), get(0,'defaultUicontrolBackgroundColor'))
set(hObject,'BackgroundColor','white');
end

function stdError_Callback(hObject, eventdata, handles)
% hObject handle to stdError (see GCBO)
% eventdata reserved - to be defined in a future version of MATLAB
% handles structure with handles and user data (see GUIDATA)
standarderror=get(handles.stdError, 'string');
handles.StandarderroR=standarderror;
% Hints: get(hObject,'String') returns contents of stdError as text
% str2double(get(hObject,'String')) returns contents of stdError as a double
guidata(gcbo,handles);

% --- Executes during object creation, after setting all properties.
function stdError_CreateFcn(hObject, eventdata, handles)
% hObject handle to stdError (see GCBO)
% eventdata reserved - to be defined in a future version of MATLAB
% handles empty - handles not created until after all CreateFcns called

% Hint: edit controls usually have a white background on Windows.
% See ISPC and COMPUTER.
if ispc && isequal(get(hObject,'BackgroundColor'), get(0,'defaultUicontrolBackgroundColor'))
set(hObject,'BackgroundColor','white');
end

function LiBfilename_Callback(hObject, eventdata, handles)
% hObject handle to LiBfilename (see GCBO)
% eventdata reserved - to be defined in a future version of MATLAB
% handles structure with handles and user data (see GUIDATA)
handles.libname=get(handles.LiBfilename,'string');
% Hints: get(hObject,'String') returns contents of LiBfilename as text
% str2double(get(hObject,'String')) returns contents of LiBfilename as a double
guidata(gcbo,handles);

% --- Executes during object creation, after setting all properties.
function LiBfilename_CreateFcn(hObject, eventdata, handles)
% hObject handle to LiBfilename (see GCBO)
% eventdata reserved - to be defined in a future version of MATLAB
% handles empty - handles not created until after all CreateFcns called

% Hint: edit controls usually have a white background on Windows.
% See ISPC and COMPUTER.
if ispc && isequal(get(hObject,'BackgroundColor'), get(0,'defaultUicontrolBackgroundColor'))
set(hObject,'BackgroundColor','white');
end

% --- Executes on button press in save.
function save_Callback(hObject, eventdata, handles)
% hObject handle to save (see GCBO)
% eventdata reserved - to be defined in a future version of MATLAB
% handles structure with handles and user data (see GUIDATA)
button = questdlg('Do you want to save new library?', ...
'Exit Dialog','Yes','No','No');

switch button
case 'Yes',
disp('Exit RGB SpecAnal');
%Save variables to matlab.mat


Effective=handles.EffectiveSignal;
Yintercept=handles.Yintercept;
[xbel xlabel]=size(Yintercept);
Slope=handles.Slope;
Rsquare=handles.Rsquare;
Standard_Error=handles.StandarderroR;
%-------------------------------------------------------------
functionMfilename=handles.libname;
functionname=functionMfilename;
filename = fullfile([functionMfilename,'.m']);
fid = fopen(filename,'wt');
%----- function [ccUnknown]=library(UnknownIntensity)---------
fprintf(fid,'function [ccUnknown EffectiveSignal]=');
fprintf(fid,functionname);
fprintf(fid,'(UnknownIntensity)\n');
fprintf(fid,'%%this function is used to calculate the unknown parameter ----\n');
fprintf(fid,'%%created on automatically M-file generator\n');
fprintf(fid,'%%-----------------------------------------------------------------\n');
%-------------------------------
fprintf(fid,'[mrows ncols]=size(concentration);\n');
fprintf(fid,'ccUnknown=ones(mrows,ncols);\n');
fprintf(fid,'%%----alculation of Unknown concentration----\n');

if Yintercept(1)==45
fprintf(fid,'ccUnknown=(UnknownIntensity+');
fprintf(fid,Yintercept(2:xlabel));
else
fprintf(fid,'ccUnknown=(UnknownIntensity-');
fprintf(fid,Yintercept);
end
fprintf(fid,')./');
fprintf(fid,'(');
fprintf(fid,Slope);
fprintf(fid,')');
fprintf(fid,';\n');
fprintf(fid,'%%---------------------------\n');
fprintf(fid,'EffectiveSignal = ');
fprintf(fid,Effective);
fprintf(fid,';%%1 = Red, 2 = Green, 3 = Blue \n');
fprintf(fid,'R-square = ');
fprintf(fid,Rsquare);
fprintf(fid,';%%----R square from linear regression \n\n');
fprintf(fid,'Standard-error = ');
fprintf(fid,Standard_Error);
fprintf(fid,';%% \n\n');
fprintf(fid,'return ccUnknown,EffectiveSignal');

%save
%close(ancestor(hObject,'figure'))
case 'No',
%quit cancel;

end

Thursday, March 29, 2012

Basic functions of MATLAB for image processing

กลับมาที่คำสั่งหรือฟังก์ชันพื้นฐานใน MATLAB ที่ใช้กับ การประมวลทางภาพ ผมจะแนะนำคำสั่งที่ผมใช้บ่อยๆ ส่วนที่ยังไม่เคยใช้ ผมต้องไปทดลองก่อนแล้วค่อยเอาเขียนเพิ่ม เรื่อยๆ แต่รายละเอียดคำอธิบายต้องไปอ่านใน MATLAB Help นะครับ

imread (' ชื่อไฟล์รูป . นามสกุล ');
เช่น image01=imread ('Bluesky.jpg'); % ให้เก็บภาพที่ชื่อ  Bluesky.jpg ไว้ในตัวแปลชื่อ image01

: คำสั่งนี้ใช้นำข้อมูลภาพเข้ามาใน MATLAB ซึ่งจะถูกเก็บเป็นข้อมูลตัวเลข เช่น 720x480x3, 1024x800 เป็นต้น หรือที่เราเรียกว่า array ถ้าเป็น array 2 มิติ เป็นภาพ grayscale ถ้าเป็น array 3 มิติ เป็นภาพสี

Monday, March 26, 2012

Tricks & Trips

- guidata(hObject,handles);
- guidata(gcbo,handles);
  
-Adding TeX on your blogger

put the script after <head> in html (Template--> edit html)

%---------------------------------------------------------

<script type="text/javascript" 
src="http://cdn.mathjax.org/mathjax/latest/MathJax.js">
MathJax.Hub.Config({
 extensions: ["tex2jax.js","TeX/AMSmath.js","TeX/AMSsymbols.js"],
 jax: ["input/TeX", "output/HTML-CSS"],
 tex2jax: {
     inlineMath: [ ['$','$'], ["\\(","\\)"] ],
     displayMath: [ ['$$','$$'], ["\\[","\\]"] ],
 },
 "HTML-CSS": { availableFonts: ["TeX"] }
});
</script>
 
%--------------------------------------------- 

Thursday, March 22, 2012

RGB image display on GUI MATLAB

จากหัวข้อที่ผ่านมาพอทราบวิธีเปิดไฟล์รูปและนำมาแสดงบน GUI กันแล้ว มาคราวนี้ผมจะแยกระบบภาพสี ซึ่งประกอบไปด้วย องค์ประกอบของ สีแดง สีเขียว และสีน้ำเงิน (RGB image) MATLAB จะเก็บภาพสีเป็น matrix mxnx3 มิติครับ โดยที่ mxn คือขนาดของภาพ และ เลขสามท้ายนี่ หมายถึง แยกเก็บเป็น matrix สามชั้น (ภาษาบ้านๆเข้าใจง่ายดี) โดยที่ mxn(1)=Red, mxn(2)=Green และ mxn(3)=Blue เมื่อแสดงพร้อมกันก็จะเป็นภาพสีดังที่เรามองเห็นครับ รายละเอียดเพิ่มเติม เข้าไปดูได้ใน MATLAB help ครับ (ไม่ได้ปัดความรับผิดชอบนะครับ แต่ help นี่ช่วยเราได้เยอะ ลองอ่านๆกันดูนะครับ)

ระบบสีใน MATLAB เป็นแบบ 8 bit image คือ มีค่าสีตั้งแต่ 0-255 (2^8=256) นั่นคือในแต่ละ pixel จะมีค่าประจำ pixel ของค่าสี RGB เมื่อภาพถูกเรียกเข้ามาใน MATLAB ให้อยู่ในรูปแบบของตัวเลขแล้ว เราสามารถดำเนินการด้านคณิตศาสตร์กับ matrix ของภาพนี้ได้ตามที่ต้องการทุกอย่างภายใต้เงื่อนไขไวยากรณ์ของ MATLAB อนุญาต การแสดงผลลัพธ์ก็คือ ภาพที่ได้รับการประมวลผลแล้ว หรืออาจเป็นข้อมูลที่แปลหรือถอดความหมายออกมาจากภาพนั้นๆ เพื่ออธิบายให้มนุษย์เราเข้าใจถึงภาพหรือคุณค่าบางประการของภาพนั้น เช่น การศึกษาการเคลื่อนที่ของมนุษย์ที่มีความ ปกติหรือบกพร่อง ทางกล้ามเนื้อและกระดูก การศึกษาการเคลื่อนที่ของเม็ดเลือดแดงในหลอดเลือด หรือการวัดความเร็วของวัตถุ face detection หรือ recognition (อันนี้มักเห็นในภาพยนต์เวลาตำรวจเอารูปถ่ายผู้ต้องสงสัยมาเทียบกับใบหน้าคนร้าย หรือการเปรียบเทียบลายนิ้วมือ) จากการถ่ายภาพ เป็นต้น เรามักได้ยินคำว่า image processing ไงครับ

ผมเป็นคนพื้นๆ ครับ ก็ต้องเริ่มจากพื้นฐานกันละครับ การประยุกต์ที่ยกตัวอย่างไว้ ก็รอไปก่อนหากมีโอกาสได้ศึกษา ลงมือทำเมื่อไร ผมจะนำมาเขียนไว้ แต่ตอนนี้ได้เวลา "Let's rock the RGB image"


เรายังต้องใช้ไฟล์ OpenImage.fig และ OpenImage.m จากหัวข้อที่แล้วแต่เพิ่มเติมส่วน radio button เพื่อเป็นตัวเลือกสำหรับเลือกแสดงรูปภาพแต่ละองค์ประกอบสี ดังนั้นสิ่งที่ต้องทำเพิ่มอีกส่วนหนึ่งก็คือเราต้องไปเพิ่ม source code เพื่อให้ โปรแกรมทำงานตามที่เราต้องการ

ในตัวอย่างนี้ radio button ที่สร้างขึ้นได้แก่
- RGB image เพื่อแสดงภาพสีต้นกำเนิด
- Red component ให้แสดงภาพเฉพาะองค์ประกอบ สีแดง
- Green component ให้แสดงภาพเฉพาะองค์ประกอบ สีเขียว
- Blue component ให้แสดงภาพเฉพาะองค์ประกอบ สีน้ำเงิน
- Gray scale image ให้แสดงภาพโทนสีเทา

สำหรับเทคนิคการแสดงภาพเฉพาะองค์ประกอบสีเดียว
สมมติ เก็บภาพสีไว้ในตัวแปรชื่อ RGBimage ถ้าต้องการแสดงภาพนี้เฉพาะสีแดง เราต้องกำหนดให้องค์ประกอบสีอื่นมีค่าเป็นศูนย์ (กำหนดเป็นสีดำ) เช่น

>>RGBimage=imread('test.jpg');
>>RGBimage(:,:,2)=0;
>>RGBimage(:,:,3)=0;
>>figure();imshow(RGBimage); title('Red-component image');

สิ่งที่ทำเพิ่มเติมคือ เลือก radio button ได้ทีละปุ่มเท่านั้นเพื่อให้โปรแกรมทำงานได้อย่างถูกต้อง ส่วนนี้ต้องเขียน function เพิ่มเติมนิดหน่อย แล้วค่อยเรียกมาใช้ ซึ่งผมตั้งชื่อว่า Turn_Off ฟังก์ชันนี้ต้องการ input ที่ชื่อว่า off ซึ่งจะบรรจุไปด้วย handles ที่ไม่ต้องการให้ทำงาน หรือปิดการทำงานนั่นเอง
ตัวอย่าง source code บางส่วนที่ต้องเพิ่มเติมเข้าไปครับ ไฟล์เต็มๆ download ได้ที่นี่ครับ OpenImage.fig, OpenImage.m, Turn_Off.m สำหรับฟังก์ชัน Turn_Off นั้นจะใส่ในไฟล์เดียวกับ OpenImage.m ก็ได้ แต่ในที่นี้เพื่อกันความสับสนเลยแยกออกมาอีกไฟล์ครับ

นี่เป็นรูปร่างหน้าตาโปรแกรมที่ทำงานได้ครับ ในภาพจะเห็นว่าจากภาพสีที่เราคุ้นเคยพอแยกให้แสดงเฉพาะสีเขียวก็แปลกตาดี นึกซะว่าตาบอดสี แดงและน้ำเงินแล้วกันครับ


% --- Executes on button press in RGBsignal.
function RGBsignal_Callback(hObject, eventdata, handles)
% hObject handle to RGBsignal (see GCBO)
% eventdata reserved - to be defined in a future version of MATLAB
% handles structure with handles and user data (see GUIDATA)
axes(handles.axes1); %ระบุว่าให้แสดงรูปใน axes ไหน
check=get(handles.RGBsignal,'value'); %รับค่าการถูกเลือก check=1 หรือไม่เลือก check=0
if (check==1)
imshow(handles.RGBimage);title('RGB image');
hpixinfo = impixelinfo;
axis off;

end

off=[handles.Redsignal handles.Greensignal handles.Bluesignal handles.Graysignal];
% ให้ radio button, RGB image เท่านั้นที่ทำงานได้
Turn_Off(off);%เรียกใช้ฟังก์ชัน Turn_Off
%guidata(hObject,handles);
% Hint: get(hObject,'Value') returns toggle state of RGBsignal

% --- Executes on button press in Redsignal.
function Redsignal_Callback(hObject, eventdata, handles)
% hObject handle to Redsignal (see GCBO)
% eventdata reserved - to be defined in a future version of MATLAB
% handles structure with handles and user data (see GUIDATA)
check=get(handles.Redsignal,'value');
axes(handles.axes1);

if (check==1)
if (get(handles.Redsignal,'value')==1)
handles.RGBimage(:,:,2) = 0;
handles.RGBimage(:,:,3) = 0;
imshow(handles.RGBimage); title('Red-component image');axis equal;axis tight;
axis off;impixelinfo;
end
end

off=[handles.Greensignal handles.Bluesignal handles.Graysignal handles.RGBsignal];
Turn_Off(off);

Sunday, March 18, 2012

Open a file from folder (GUI MATLAB)

วันนี้ผมจะนำเรื่องการเปิดไฟล์รูปจากโฟลเดอร์ที่เก็บรูปไว้ แล้วนำมาแสดงบน GUI ที่สร้างขึ้นมา

เริ่มต้นที่ command window MATLAB
พิมพ์ตามด้านล่างเพื่อเรียก GUI design environment (GUIDE) tools ขึ้นมาใช้งานครับ

>>guide

จะปรากฎ GUIDE Quick Start ---> Blank GUI (default) ---> OK


จากนั้นเลือก สร้าง Push button เพื่อสร้างปุ่มกด และ Axes เพื่อรองรับรูปที่จะเปิดมาแสดง


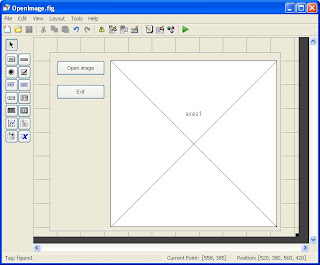
พร้อมกับ บันทึกเป็นชื่อ OpenImage.fig ขณะเดียว MATLAB ก็สร้าง m-file ขึ้นมาให้เราโดยอัตโนมัติ m-file นี้เองที่เราจะต้องไปแก้ไขเพิ่มเติม source code ให้โปรแกรมทำงานตามที่เราต้องการ โปรแกรมที่สร้างขึ้นก็มีรูปร่างหน้าตาประมาณนี้ครับ


ผมเพิ่มเติมส่วนการแก้ไข คุณสมบัติของ components ต่างๆ คลิ๊กขวาแล้วเลือก Property Inspector ครับ จากนั้นก็แก้ไขตามสะดวกครับ แต่ในที่นี้จะเน้นหลักที่จำเป็นครับ ได้แก่
- string จะเป็นตัวอักษรที่แสดงบน GUI ที่เราสร้างขึ้นควรเป็น คำหรือข้อความเพื่อสื่อความหมายถึงหน้าที่ของเครื่องมือนั้นๆ
- Tag จะระบุชื่อของ component นั้น ซึ่งจะปรากฎใน source code (แนะนำว่าให้ตั้งชื่อที่สอดคล้องกับ string เพื่อความง่ายแก่การจำ เผื่อว่าเรามี components เยอะๆ)

ลองสังเกตจากรูปด้านล่างนะครับ


พอกดปุ่ม Run figure (ปุ่มสามเหลี่ยมสีเขียวด้านบน) ก็จะได้โปรแกรมประมาณนี้เลยครับ


แต่โปรแกรมยังทำอะไรไม่ได้ เราต้องไปเพิ่ม code ก่อนครับ


ผมขอยกมาเฉพาะส่วนที่ต้องเพิ่มเติมเท่านั้นครับ เราจะแก้ไขเฉพาะส่วน function callback เท่านั้นครับ ไฟล์เต็มๆโหลดตรงนี้้เลยครับ ===> OpenImage.fig, OpenImage.m


% --- Executes on button press in pushOpen.
function pushOpen_Callback(hObject, eventdata, handles)
% hObject handle to pushOpen (see GCBO)
% eventdata reserved - to be defined in a future version of MATLAB
% handles structure with handles and user data (see GUIDATA)
[F,PathName,FilterIndex] = uigetfile({'*.*','All Files(*.*)'}, 'Select your File ');
input=strcat(PathName,F);
RGBimage=importdata(input); % เก็บรูปไว้ในตัวแปลชื่อ RGBimage
axes(handles.axes1); % ต้องระบุ axes ให้ด้วยว่าจะแสดงตรงไหน
imshow(RGBimage); % เป็นฟังก์ชันการแสดงรูปครับใน MATLAB ครับ
hpixinfo = impixelinfo; % บอก ตำแหน่งที่เม้าท์ชี้ พร้อมค่า R, G และ B ประจำ pixel นั้นๆ
zoom on;
axis off;
guidata(hObject,handles);


% --- Executes during object creation, after setting all properties.
function axes1_CreateFcn(hObject, eventdata, handles)
% hObject handle to axes1 (see GCBO)
% eventdata reserved - to be defined in a future version of MATLAB
% handles empty - handles not created until after all CreateFcns called

% ฟังก์ชันนี้ต้องสร้างขึ้นเองครับ โดยไปที่ OpenImage.fig คลิ๊กขวาที่ axes1
% เลือก View Callbacks --> CreateFcn จะได้ code ในส่วนนี้ขึ้นมาแต่ไม่ต้องทำอะไร
% Hint: place code in OpeningFcn to populate axes1


% --- Executes on button press in pushExit.
function pushExit_Callback(hObject, eventdata, handles)
% hObject handle to pushExit (see GCBO)
% eventdata reserved - to be defined in a future version of MATLAB
% handles structure with handles and user data (see GUIDATA)
button = questdlg('Do you want to quit?', ...
'Exit Dialog','Yes','No','No');
switch button
case 'Yes',
disp('Exit RGB SpecAnal');
%Save variables to matlab.mat
save
close(ancestor(hObject,'figure'))
case 'No',
quit cancel;
end


หน้าตาโปรแกรมที่สามารถทำงานได้เป็นแบบนี้ครับ และครั้งต่อไปผมจะแยกแสดงสีของรูป แล้วแสดงที่ละสีครับได้แก่ Red, Green and Blue หรือรูปแบบสีเทา (gray scale image)